Saturday, September 15, 2018

Trick-or-Treat: Lawnfawnatics Challenge 36

Today I am showing a card that I made to enter into the Lawnfawnatics challenge 36.  This challenge was all about using a mood board to inspire your crafting.

The mood board that I used had an autumn theme to it. Thinking of leaves changing and falling I had thought of Halloween. I choose to make a trick-or-treat card because what would be more fun!


I wanted to make my card spooky with a bright and fun feel to it! I choose some fun rainbow paper by Lawn Fawn and used a die to cut a banner out. Using orange paper I used the stitched star frame die to cut an orange star. I had also cut a stitched star out for the center of my card using a blue textured paper. I used a spooky fence border die along with a few types of grass border dies to make a scene. The spider web die that I used is called cute cobweb. It is such a fun die! All of the dies that I have used along with the stamped images you can find through Lawn Fawn. 


I added some distress ink to the edges of my die cuts to give them a dimensional look. For my orange star I added iridescent embossing powder, it looks so much more sparkly in person! I cut my spiders and cobweb out with a black paper attached to a double sided sticky paper. I then sprinkled them with a fine black glitter and for the spiders feet I added a green glitter.  Behind the cobweb you can find a velum paper that I colored with copics. At the top of my card I used a negative from the bayou backdrop as a stencil to add some black crackle paste. 

The rainbow banner that I had cut needed to be darkened so I followed the rainbow pattern and used distress inks around the edges. I had colored it a little too much and was able to fix it with a white pigment marker. I also darkened the edges using grey and black distress inks. I always try to fix something before throwing it out and restarting and usually I can still get the results that I want.


 All of my stamped images are from different lawn fawn sets. I colored all of the images in with copic markers.  I just love coloring with copics and it very well may be my most favorite part of making a card! I want to mention that you really do not need every copic out there. Just start with your favorite shade and pick one light-tone and one mid-tone to go with it.

Everyone have a great day and
until next time keep crafting!

Kris-Kit-Craft


Saturday, September 1, 2018

Christmas Elf shaker card

I’m using my Christmas spirit for today’s card! There has been so many goodies released by Lawn Fawn to use for the upcoming holidays. I just had to get an early start after bringing home the “ Holiday Helpers” stamp set.


I will be submitting this card into the Lawnfawnatics coffee tea and treats challenge #35. I somehow put this card together without to much thought. I knew that I wanted to use an inside scalloped circle die cut and a square die cut. I was having a hard time imagining what it would look like, but I did not give up. After incorporating a patterned paper and a snowflake background the card started to come together


The patterned paper that I used is from Lawn Fawn’s let’s bokeh in the snow. I love the chill feel of the bokeh paper. I inked my square up with a couple of distress inks and broken china oxide ink. After spritzing the square with Tim Holtz bronze mica spray I added Some Nuvo moonstone glitter paste to the top of the square. I had also used broken china oxide ink along with a couple of rangers archival inks to make my snowflake background. I had so much fun coloring and decorating the wreath, which by the way you can also find through Lawn Fawn. I started coloring my first wreath with some G copics and a second wreath to layer behind the first was colored using YG copics. Layering the wreaths adds some fun dimension! My berries were coloured with copics and then I jazzed them up with sprinkled sugar stickles and glossy accents. I added a touch of ivory Nuvo drops to the ends of some of the wreath for a snowy feel. The cute bow at the center of the wreath was coloured in with copics and then glittered up with Nuvo moonstone glitter paste. This paste is so easy to apply, it has an oily feel to it and it just wants to mend with the paper.

Now I want to share my favorite part! I had coloured the cute elf helpers in with copics, along with the rest of my stamped images. To add some sparkle detail to some of the images I applied prisma fine glitter with a Sakura quickie glue pen. I used this glitter on the balls of the Santa hats along with the sweet treats that the elves are enjoying. I also had to add some sparkle to my unicorn's horn using a wink of Stella glitter brush pen and I followed it up with glossy accents. 


Finally I would like to share with you the shaking fun part of the card! I added a vellum window with Pretty Pink Posh sequins enclosed inside. The look of vellum can add so much warmth to a Christmas card. I filled the shaker up with mostly gold stars and a few pink and blue sequins. I was trying to match the sequins up with the lovely colours in the sentiment “Merry and Bright”. This sentiment is from the Lawn Fawn “Snow Days”  set. 

I enjoyed making this card just as I always enjoy using Lawn Fawn’s cute little critters! You really just can’t get enough of them (you have to have them all). If you have any comments or questions please leave them below, I’d love to hear from you. 

Happy crafting,
Kris-Kit-Craft

Friday, August 24, 2018

Magical Fun Folds Challenge 33 using a Pivot Pop Up

 I have joined the Lawn Fawnatics fun folds challenge. There are so many folds that can bring a different look to your card. For my fun fold I used Lawn Fawn's "pivot pop up die".


  The pivot pop up die is so cool! The front of your card looks normal and once it is opened there is a "wow" factor. Its almost like a paper magic trick. I wanted my card to be as magical as the pivot pop up. I once again choose a unicorn theme. 


I added the bayou backdrop to the front of my card to make a dream-like scene. I colored all of my scene pieces with distress ink, concentrating more color to the ends of my die cuts. I then added detail with a white gel pen. I used glitter paper to die cut some leaves and I added these to the bayou backdrop. To pretty up the background I added some tonic holiday cheer nuvo glitter to a few of the mountain tops. I colored the Unicorn in with copic markers and I added wink of stella clear glitter and glossy accents to the horn.

Now I will show you the magical inside of the card! Let me forewarn you, it takes some work to put together a pivot pop up. Each side of the card must have the same amount of bulk for the pop up to pivot properly. You also will need to line up the score line of the mechanism with the score lines of the card. 


I started the background of my card by die cutting the corners with Lawn Fawn's starry skies.  I then used Distress oxides and inks, concentrating the darker color towards the corners. The distress inks will blend so much better if you also use an oxide ink. After everything was blended nicely I splattered a little bit of water over my blue sky to give it a starry look.  I also added a gold paper by Tonic behind the sky. It looks like the stars are shining on through the night sky. I added some purple clouds for a more dreamy look. I had also used oxides and inks to color the clouds in.

I had colored all of my stamped images with copic markers. To carry out the scene I used the same gold paper for the stitched stars and the tree trunks. The sentiment "Make a wish" was heat embossed with gold embossing powder. I used the same plaid paper by Lawn Fawn for the tree tops and for the stitched scalloped frame at the bottom of the card. I brushed the ends of the tree tops with the same purple oxide ink that the clouds were inked with. I added a final sentiment at the bottom of the card  "Have a magical day", I stamped this sentiment with black versafine ink and heat embossed it with clear embossing powder.

That about sums up this card, please leave any comments or questions below. Until next time, Have a Magical Day!

Kris-Kit-Craft


Monday, July 30, 2018

Surfing Unicorn, Window Shaker Card

  Today I have a birthday card to show you! I made this card for my daughters friend. They are always in the pool with floaties, just hanging out and having fun. My card was inspired by the little personalities that these girls behold.


  I used Lawn fawn stamps in this card, they are just so fun and adorable. The unicorn is from "Costume Party", the duck is from "Rub-A-Dub-Dub", The narwhal and seahorse are from "Mermaid For You", the otter and hearts are from "Christmas Like No Otter" and the coral is from "Critters in the Sea". The patterned paper I used is from Doodle Bug. I used Canson XL watercolor paper to do some water coloring on. The die cuts that I used are also by Lawn Fawn. You can see here a stitched rectangle for the card front, a stitched wave and a surfboard-like shape. The stitched wave that I used was die cut from poka dotted paper. I used a die cut that pairs with the Lawn Fawn stamp set "Life is Good" and placed it upside down to make it appear like a surfboard. It is so cool what you can do with your dies by just thinking out of the box.


 To color the stamped images I used Copic markers. I love the little duckie that is peeking its head under the water and the little girl in the unicorn costume is just so cool surfing on her board.  The water coloring was done with Gansai Tambi paints. I had used a minty green color, 3 different hues of blue  and a silver color. I carried the color flow throughout the top of the card by flicking the paints with my brush.


  You can see these beautiful sequins by Pretty Pink Posh up close in this image. I had used Lawn Fawn's chunky glitter to add some variety of sparkle. To make this card a shaker I had to die cut a rectangle window through the front of my card. I was then able to seal the shaker elements in between 2 pieces of acetate.


  I thought that the Lawn fawn sentiment "to a friend like no otter" was a perfect fit for this card. The sentiment is from the Lawn Fawn stamp set "Christmas Like No Otter". I had stamped the sentiment on a stitched die cut circle for interest. 

I hope you enjoyed this card, it was so much fun to make! thanks for stopping by!


Thursday, July 19, 2018

A Lawn Fawn Water Park / Lawn Fawnatics challenge 32

 Lawn Fawnatics challenge no.32


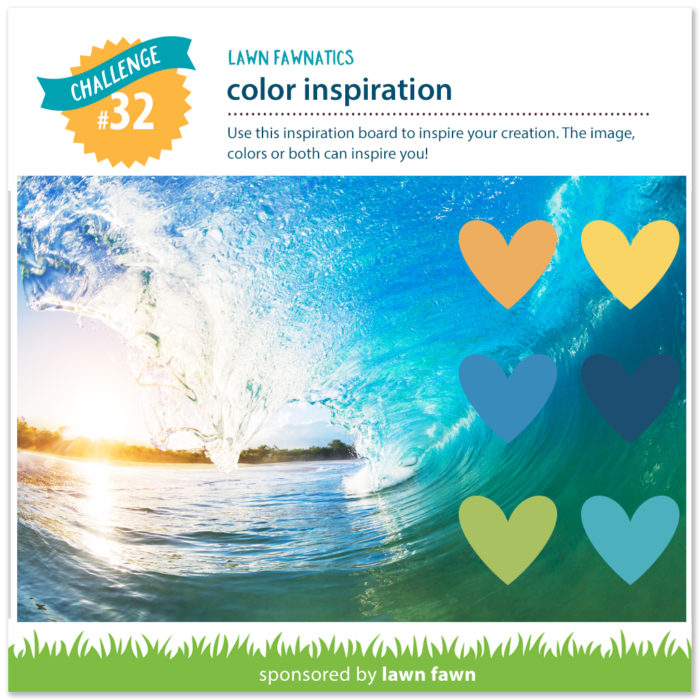
  Today's card was made for the Lawn Fawnatics challenge no. 32 color inspiration. I had used the mood board up on the Lawn Fawnatics blog to start mapping out my card out. I really like to get into the creativeness of the challenge, I never just take it easy and make a simple card. Here is a sample of the mood board to your right. 

  When I thought of this card it had really started with how can I incorporate a roller coaster into this ocean of a mood board. I did not want to just use a regular roller coaster so I started to think of what critter could I turn into a cart for another critter to ride in. Once I figured out that the narwhal fit in perfectly I just started to stamp all my favorite ocean images to fit into a scene. When I started to put my scene together I had to think of a way for the bear and squirrel like fox critter to go with the flow. After all you do not swim with your arms up in the air, but I could of had them catching some waves. I wanted to portray a lazy river (my personal favorite part of a water park). I looked at some of my stamps and than I remembered that I had a donut stamp and a tire that could have worked. I choose the donut, I just cut a little slit in the middle and stuffed those critters in. This was such a fun scene to put together.


I want to share with you the products I used and the details within my card. For my scene I used various Lawn Fawn stamp sets and the stitched wave dies by Lawn Fawn. The hillside I have is by mama elephant. All my images were colored with a color theme in mind using copic markers.  I very rarely buy the dies to go with my stamps so  all of the stamped images were cut out by hand (can you believe it). At the end I added wink of stella clear glitter over the darkest shade of color on pretty much every stamped image except for the animals. My mermaid was full on glitter from her tail to her top all the way up to her shell barret.  For the cotton candy and the shopping stand I added spinkled sugar stickles. This gives the cotton candy a true to sugar look.  I wanted more glitter in my card so I added a clear stardust stickles to the darkest wave and a peacock stickles to the lightest wave. I added Lawn Fawn's chunky glitter in the front of my card which allowed the scene to flow together.  I just have to say that this chunky glitter is the best I love it! A final touch of  detail was added to the balloons inner tubes and cotton candy using glossy accents.

Here is a close up of my favorite view on the card

Its really just so much fun creating with Lawn Fawn products. It keeps me busy and amused on those days that I am just staring at the t.v. while wondering through my head and wondering why I am bored. I am happy that you stopped by and I hope that I inspired you in some way.


Wednesday, July 18, 2018

A Neon Claw Machine

  Today I am Showing off a fun card that I made using Lawn Fawn stamps from the sets "Clawsome" and "Screen Time"!  Some of my cards I may make just for fun, but others are for special occasions.  Now today's card has a cute story behind it.


 I had purchased this stamp set after my eight year old daughter pointed out to me that we just had to have it. She just loves claw machines and stuffed animals, plus I think her spirit animal may just be a unicorn.  Every time we go to a claw machine there is never just two quarters put in for one play. You always wind up spending about $5 for that one special toy.  well as you can see this little person critter had a ton of fun pulling out that unicorn.


   The background of my card was made using distress oxides with a star stencil from MFT stamps and I had water colored the floor in. I colored all my stamped images in using copic markers.

  I wanted to color in neon lights around the claw machine to do this i had to draw a border around it. For the lights I  used a darker marker in the center and than my medium and lightest copic surrounding the darker color. Just play around with your copics because there are a lot of neat looks you can attain.

   I used a masking  technique for my big pile of teddy bears. This is quite easy to do and there are lots of videos out there to become a masking professional! I colored the teddy bears in giving them a cute stuffed animal look. After this I colored in the girl giving her a poca dotted shirt and jeans. I wanted the unicorn to stand out so I colored it in with the same colors used in the bears and for the horn a touch of dark pink, orange, and green.

  After my coloring was done  I adhered the claw machine with glue and than added some vellum over the window. This gave it a great look while not letting the bears inside stand out so much.  I adhered the girl over the teddy bears and than popped them up with foam squares to give some dimension. The unicorn was adhered with glue dots for a touch of dimension. I finished the claw machine off using a wink of stella pen and glossy accents over the stars, control stick and buttons. I had also used wink of stella on the unicorn's horn and the nose area. For a final touch I added some sequins and chunky glitter from Lawn Fawn. This was such a fun card to make and I hope you were inspired in some way.

  This card will be given to my daughter who inspired me to make it. It will make a cute decoration on her shelf. I hope you enjoyed reading and please put down any questions or thoughts below.

  Thanks for stopping by!


Friday, July 6, 2018

Fourth of July: Lawn Fawn Stars in the Galaxy

   I had a relaxing 4th of July. There was a possibility of the fireworks getting rained out so we just stayed at home. We ate some good grub and made some s'mores. I hope everyone had a safe and relaxing 4th of July with the Family!


  I have 2 cards today with a galaxy rainbow feel to it. My first one is pretty simple just make your background and do some die cutting (I used Lawn Fawn Dies). I was in the mood to celebrate 4th of July using stars. This is more of an artsy 4th of July card.


Inlaid Star Die Cutting


  I used Gansai watercolors for my galaxy background, i applied each color with my silverbrush. after the colors are dry apply black in some areas. Once dry I could do the next step (inlay die cutting) . I die cut 2 of the outside in stitched stars at the upper center of my background. Then I die cut the starry skies at each upper corner of my card. I was now able to use distress die inks to add some color to show through the die cuts. To finish the card off I made a gold border using glitter paper and 2 rectangle dies.


Sparkly Die Cuts Using Stickles Glitter


  Using the Galaxy Background I stamped a sentiment & stars from critters ever after by Lawn Fawn and embossed them in white embossing powder. I applied gilded gold stickles over the yelow paint to brighten the card up. I then die cut the Lawn Fawn Stitched Star Frames to add some interest. Next I decorated the stars with stickles. I also added 2 mini stars from the star frames die set and decorated them with stickles. Just a note: the stickles I had used went bad they were bubbly and runny. 

I hope you enjoyed today's cards. Thanks for stopping by.


Tuesday, July 3, 2018

Lawn Fawn shaker card with Tonic craft kit 11

  Today I,m showing how I incorporated Lawn Fawn products in with the Tonic studios monthly craft kit #11. The dies that I received from this kit are Christmas related. July is the month of the year that crafter's start to play Christmas! You can get all your stamps and dies out that you have not seen for 6 months and get started on your winter holiday cards and tags (without looking crazy) :)

  For this card I really wanted to make a shaker card and I already had the Lawn Fawn critter huggers deer cut out and ready to paste. This was a fun and easy peezy card to make.


I also have my first YouTube video of this card in action. Enjoy!


Supplies used:

Lawn Fawn woodland critter huggers die 
Lawn Fawn spring sprig die
Tonic craft kit 11
Fuse tool and pocket
Pretty pink posh marshmallow sequins
Martha Stewart star sequins
Distress ink: espresso, antique linen and worn lipstick
White gel pen
Mama elephant sentiment 

Saturday, June 30, 2018

Lawnfawnatics challenge #31

  Lawnfawnatics challenge #31 flowers, floral and foliage has been so much fun. It was a little challenging for me to put together the colors that I wanted to use. I used lawn Fawn patterned paper for the most part. Some of us cardmakers have a hard time getting the look we want with patterned paper. I will be giving this card to my mom, for the hope of her putting it in her office. I’m sure that she will smile at the beautiful flowers and the interactive fairy.


  For this card I had used lots of Lawn fawn Die cuts and only one of their stamp sets. For my card base I had used a cross stitched rectangle. To bring a focal point to the card I added a stitched scalloped frame. I then die cut an outside stitched heart and added an acetate window. You can see that a slot was cut to add some interactive fun! I had die cut a tag shape to make the interactive fun happen! I lengthened the die cut by partially die cutting the top of the tag and then moving the plate and die down to die cut the bottom. This may make more sense by watching a video on lengthening die cuts.


 I die cut my flowers and the pot using Lawn Fawns spring sprig dies and little flowers dies. I had added detail to these flowers using acrylic paint. I then added Ranger's stickles to the middle of some of the flowers. The pot was shaded using brown distress ink and a brown big brush marker. My Lawn Fawn fairy was colored using copic markers and I added wink of stella glitter to the star wand. 


  I had die cut hello from a Lawn Fawn die and placed it right above where the fairy pops out. It is so much fun moving this fairy, when she is in view its almost like she is saying "hello"!

Thanks for stopping by, I hope you enjoyed today's card card!

Saturday, June 16, 2018

Happy Papa’s Day, for Lawnfawnatics challenge 30


        This is a card that my daughter helped with. She did color the sprinkles and also helped with the sentiment and colors to be used. Making this card did help her get off of the tablet and be entertained. Three things were accomplished; the tablet was put down, a card was made and my daughter was not bored.


Here is a card that I made with some of the same Lawn Fawn dies.


Have a great Father’s Day with your family!

Father’s Day card for Lawnfawnatics challenge 30

Hello Fellow Readers,

    I love the toadally awesome Lawn Fawn set. The toads are cool looking and the bayou backdrop goes perfect with it. I used alcohol inks for the background and embossing powder on the frame while adding Nuvo ivory seashell drops to some of the leaves. The flying toad was dressed in a hat and glasses from impression obsessions. This card was a lot of fun, definitely not clean and simple.


Have a great father’s Day!

Tuesday, May 29, 2018

Lawn Fawnatics #29


Lawn Fawnatics Challenge # 29


https://www.lawnfawnatics.com/wp-content/uploads/2018/05/LawnFawnatics_summer-inspo-29-e1526845365734.jpg

Above is a link to the inspiration board that I used for this challenge.


    This is my first go at making a magic slider card and I think it has been a year since I have even made a card. I had been busy whith school and the crafting had to be put on hold.

    For my centerpiece I used the  magic slider dies made by Lawn Fawn. This made the process of putting everything together much more easy. Making an interactive card makes crafting much more exciting.

  Enjoy